Home | Aidan Lee
Haxe 4.3 is out and with it comes interop improvements both big and small for the c++ target, this article will cover all the interop changes in this new release as well as practical examples.
Generic Extern Classes
Prior to 4.3 externing templated classes required writing a fair bit of boiler plate code as generic extern classes caused the compiler to generate invalid C++. Say, for example, you wanted to extern std::vector<int>, that would require you to do the following.
@:structAccess
@:include('vector')
@:native('std::vector<int>')
extern class StdVectorInt {
    function push_back(v : Int) : Void;

    function data() : cpp.RawPointer<Int>;
}
Now, what if you wanted an extern of another std::vector type? You can’t use generic arguments with extern classes, so you have two choices. Either copy and paste that extern you wrote and change the types, or you could introduce an intermediate generic extern. The issue with generic extern classes was always code generation, but we can use them for code re-use and sub class them for the specialisations of the templated type.
private extern class StdVector<T> {
    function push_back(v : T) : Void;

    function data() : cpp.RawPointer<T>;
}

@:structAccess
@:include('vector')
@:native('std::vector<int>')
extern class StdVectorInt extends StdVector<Int> { }

@:structAccess
@:include('vector')
@:native('std::vector<double>')
extern class StdVectorFloat extends StdVector<Float> { }
Not brilliant as it still requires you to sub class the extern for every template specialisation you want to interop with, but it works.
In haxe 4.3 all of this is no longer required! Generic extern classes can be used to represent templated types in C++ with no fuss.
@:structAccess
@:include('vector')
@:native('std::vector')
extern class StdVector<T> {
    function new();

	function push_back(_v : T) : Void;
}

function main() {
	final ivec = new StdVector();
	ivec.push_back(1);

	final fvec = new StdVector();
	fvec.push_back(1.4685);
}
Now generates the following C++.
void Main_Fields__obj::main(){
            	HX_STACKFRAME(&_hx_pos_195033e4c87195a0_1_main)
HXLINE(   2)		std::vector<int> ivec = std::vector<int>();
HXLINE(   3)		ivec.push_back(1);
HXLINE(   5)		std::vector<Float> fvec = std::vector<Float>();
HXLINE(   6)		fvec.push_back(((Float)1.4685));
            	}
Lovely!
haxe.Int64 Code Generation
Up until now the haxe.Int64 type was implemented as a stack allocated C++ class containing two ints, one for the high 32 bits, and the other for low 32 bits. If you wanted to interop with 64bit values you had to use cpp.Int64, but historically this extern type wasn’t usable in most haxe containers. haxe.Int64s were also boxed when used in arrays or as map values, due to this if you tried to use something like Pointer.arrayElem on a Array<haxe.Int64> you would not be getting an address to a contiguous chunk of memory for the 64bit ints in the same way you would with Array<Int>.
With 4.3 haxe.Int64 is now implemented as an abstract around cpp.Int64, so the stack based class with two ints is no more as the generated code uses native C++ 64 integers. On top of that the Array and Map implementations have been updated to have dedicated 64bit int storage capabilities. Your 64bit ints will no longer be boxed and for arrays will be stored in contiguous memory opening up easier interop possibilities.
final a = [ 7i64, 6442450941i64 ];
final p = cpp.Pointer.arrayElem(a, 0);

// `p` is now a pointer to contiguous 64bit int memory.
Array Access for Externs
ArrayAccess is a special interface extern classes can implement which allows you to use array access syntax on extern classes. While this type allows you to use array access syntax on the haxe side it did not generate array access in the C++, instead it assumes the extern class implementing this interface is a subclass of hx::Object and generates function calls based on that assumption. In short, you couldn’t use this interface to use array access syntax on the haxe side and have the generated C++ use array access syntax. Going back to std::vector, you had to create an abstract and use untyped to manually generate array access.
@:structAccess
@:include('vector')
@:native('std::vector<int>')
private extern class StdVectorIntImpl {
    function push_back(v : Int) : Void;

    function data() : cpp.RawPointer<Int>;
}

abstract StdVectorInt(StdVectorIntImpl) {
    @:arrayAccess function get(i : Int) : Int {
        return untyped __cpp__('{0}[{1}]', this, i);
    }

    @:arrayAccess function set(i : Int, v : Int) : Int {
        untyped __cpp__('{0}[{1}] = {2}', this, i, v);

        return v;
    }
}
A new bit of meta has been introduced to address this, if your extern implements ArrayAccess and you add the :nativeArrayAccess meta it will generate array access syntax in the C++.
@:structAccess
@:nativeArrayAccess
@:include('vector')
@:native('std::vector')
extern class StdVector<T> implements ArrayAccess<cpp.Reference<T>> {
    function new(size : Int);

    function push_back(_v : T) : Void;
}

function main() {
    final ivec = new StdVector(1);
    ivec[0] = 7;

    trace(ivec[0]);
}
void Main_Fields__obj::main(){
            	HX_STACKFRAME(&_hx_pos_195033e4c87195a0_11_main)
HXLINE(  12)		std::vector<int> ivec = std::vector<int>(1);
HXLINE(  13)		ivec[0] = 7;
HXLINE(  15)		::Sys_obj::println(ivec[0]);
            	}
Extern Enums
It can often be easier to write the hxcpp glue code in C++, creating haxe objects in C++ and then extern those wrapper functions in the haxe side, but returning data as a haxe enum from C++ usually requires several lays of conversion.
The following code is from a libuv extern library, it converts a libuv error code into an “anonymous” enum in C++ and returns that to the haxe side.
hx::EnumBase create(const String& name, const int index, const int fields)
{
    auto result = new (fields * sizeof(cpp::Variant)) hx::EnumBase_obj;

    result->_hx_setIdentity(name, index, fields);

    return result;
}

hx::EnumBase uv_err_to_enum(const int code)
{
    switch (code)
    {
        case UV_ENOENT:
            return create(HX_CSTRING("FileNotFound"), 0, 0);
        case UV_EEXIST:
            return create(HX_CSTRING("FileExists"), 1, 0);

        /** Other cases omitted **/

        default:
            return create(HX_CSTRING("CustomError"), 13, 1)->_hx_init(0, String::create(uv_err_name(code)));
    }
}
To access this data in the haxe side we need to use the cpp.EnumBase api. I call these enums “anonymous” because they are not strongly named (switch expressions with them don’t work in the normal haxe way), so to make them more ergonomic to use in haxe you can then convert them to a normal haxe enum.
enum IoErrorType {
	/** File or directory not found */
	FileNotFound;
	/** File or directory already exist */
	FileExists;

    /** Other cases omitted **/

	/** Any other error */
	CustomError(message:String);
}

abstract AsysError(cpp.EnumBase) {
    @:to public function toIoErrorType() {
        return switch this._hx_getIndex() {
            case 0:
                IoErrorType.FileNotFound;
            case 1:
                IoErrorType.FileExists;

            /** Other cases omitted **/

            case 13:
                IoErrorType.CustomError(this.getParamI(0));
            default:
                IoErrorType.CustomError('Unknown Error ${ this._hx_getIndex() }');
        }
    }
}
This obviously isn’t great as we have two of the same enum and if you’re using this quite a lot the allocations could add up. This code is also quite brittle, if you change an index value in the C++ side you need to remember to change it in the haxe side. There are ways you could work around this, e.g., externing an enum from the C++ side which defines the integer values, but you’ll still need to perform this conversion to make the enum nice to use in haxe.
Extern enums are designed to work around this, you can define a fully named haxe enum in C++ (essentially hand writing what the compiler would generate) and then externing it to haxe. The advantage of this is that these enums are usable from haxe the same as any haxe generated enum is and are a lot less brittle.
HX_DECLARE_CLASS0(IoErrorType)

class IoErrorType_obj : public hx::EnumBase_obj {
public:
    typedef IoErrorType_obj OBJ_;

    enum Type {
        TFileNotFound,
        TFileExists,
        /** Other enums omitted **/
    }

    IoErrorType_obj() = default;

    HX_DO_ENUM_RTTI;

    String GetEnumName() const { return HX_CSTRING("IoErrorType"); }
    String __ToString() const { return HX_CSTRING("IoErrorType.") + _hx_tag; }

    IoErrorType FileNotFound() {
        return hx::CreateEnum<IoErrorType_obj>(HX_CSTRING("FileNotFound"), Type::TFileNotFound, 0);
    }

    IoErrorType FileExists() {
        return hx::CreateEnum<IoErrorType_obj>(HX_CSTRING("FileExists"), Type::TFileExists, 0);
    }

    static bool __GetStatic(const String& inName, Dynamuc& outValue, hx::PropertyAccess access) {
        if (inName == HX_CSTRING("FileNotFound")) { outValue = IoErrorType_obj::FileNotFound_dyn(); return true; }
        if (inName == HX_CSTRING("FileExists")) { outValue = IoErrorType_obj::FileExists_dyn(); return true; }
        // etc, etc...

        return hx::EnumBase_obj::__GetStatic(_inName, _outValue, _propAccess);
    }

    hx::Val __Field(const String& inName, hx::PropertyAccess access) {
        if (inName == HX_CSTRING("FileNotFound")) { return IoErrorType_obj::FileNotFound_dyn(); }
        if (inName == HX_CSTRING("FileExists")) { return IoErrorType_obj::FileExists_dyn(); }
        // etc, etc...

        return hx::EnumBase_obj::__Field(_inName, _propAccess);
    }

    int __FindIndex(String inName) {
        if (inName == HX_CSTRING("FileNotFound")) { return TFileNotFound; }
        if (inName == HX_CSTRING("FileExists")) { return TFileExists; }
        // etc, etc...

        return hx::EnumBase_obj::__FindIndex(_inName);
    }

    int __FindArgCount(String inName) {
        if (inName == HX_CSTRING("FileNotFound")) { return 0; }
        if (inName == HX_CSTRING("FileExists")) { return 0; }
        // etc, etc...

        return hx::EnumBase_obj::__FindArgCount(_inName);
    }

    HX_DEFINE_CREATE_ENUM(IoErrorType_obj)

    STATIC_HX_DEFINE_DYNAMIC_FUNC0(IoErrorType_obj, FileNotFound, return)
    STATIC_HX_DEFINE_DYNAMIC_FUNC0(IoErrorType_obj, FileExists, return)

    hx::Class IoErrorType_obj::__mClass;
};
// If you follow hxcpp naming convensions you won't need to annotate the extern with any meta.

extern class IoErrorType {
    FileNotFound;
    FileExists;
    /** Other enums omitted **/
}

function main() {
    switch create() {
        case FileNotFound:
            trace('not found');
        case FileExists:
            trace('file exists');
        /** Other enums omitted **/
    }
}

function create() : IoErrorType {
    return untyped __cpp__('IoErrorType_obj::FileExists()');
}
Yes, you need to type a lot of code (you’re essentially doing the compilers job) and in reflection areas it could break if you forget to update a name (you could probably improve on the code I wrote above in that area), but it allows you to use the enum straight away after you pass it into haxe. Not an ideal solution and in many cases, it may be better to keep enums just to haxe code to avoid this entirely, but the option is now available to you, pick your poison!
Finally you can now use multiple hxcpp specific metadata on externs, previously only the first would apply and the rest silently ignored. This prevents you from needing to use the much more verbose header code meta to include multiple header files or using proxy inheritance objects to make sure the includes are properly imported.
@:headerInclude("header1.h")
@:headerInclude("header2.h", "header3.h")
@:cppInclude("header4.h", "header5.h")
class Main
{
    static function main()
    {
        SomeLib.someFunc();
    }
}

@:include("other_header1.h", "other_header2.h")
@:include("other_header3.h")
@:depend("Class1.h", "Class2.h")
@:depend("Class3.h")
extern class SomeLib
{
    @:native("someFunc") static function someFunc() : Void;
}
For the last 6 months or so I’ve been working on a debugger for hxcpp programs which uses a sourcemaps approach, this post is going to be an overview of the why, what, and how of that.
Isn’t there already a debugger?
There is, and to give a bit more context into what makes mine different I’m going to go into a bit of detail into how the current one works. With hxcpp-debugger (the existing debugger) your program essentially debugs itself. If you’ve ever looked at the c++ haxe generates you’ve probably seen lots of “HXLINE calls placed around. These are c++ macros which in a non-debug build expand to nothing, but when compiling with debugger support, they expand to the following.
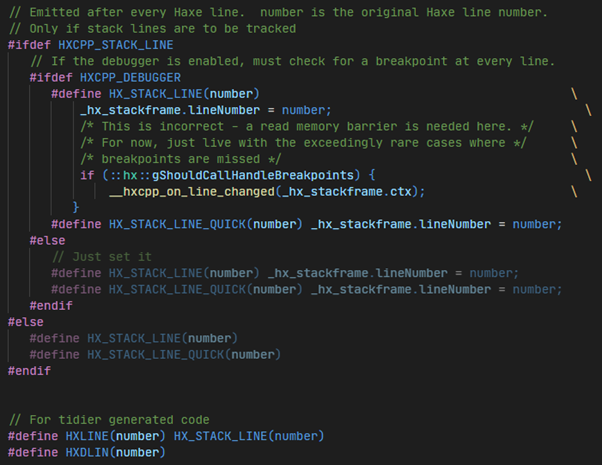
As you can see these macros expand to generate code which checks for breakpoints at the beginning of the c++ code which maps back to a haxe line. “HX_VAR” is another macro function which, with debugging support, expands to code which generates stack objects for inspecting haxe variables and changing their values.
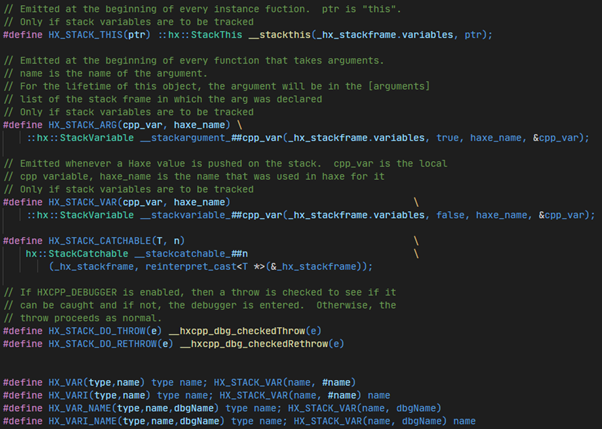
There are many other macros which expand to other code for tracking information relevant to the haxe code you originally wrote. A separate thread then runs in the background which has a TCP socket for receiving requests for information and sending responses about the state of the program.
One final part I’m going to cover is null pointers since this will come up again later. Heap allocated objects are stored as pointers in a stack allocated “hx::ObjectPtr” class in the generated C++, this class overrides the “->” pointer access operator and performs a check for a null pointer.
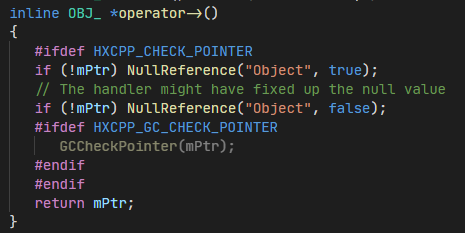
The “NullReference” function contains a bunch of code for pausing haxe threads and reporting the null pointer error through the debugging thread.
Whats the problem with it?
The program debugging itself does work in many cases and is very portable, if you want to port hxcpp to a new platform all you need to do is implement the sockets and you can start debugging. But, as you’ve seen, this relies on the compiler generating these macro calls which expand into the scaffolding code. In the case where such code does not exist any errors will not be caught and the program (and debugger since they’re the same) will crash with no hint of what happened.
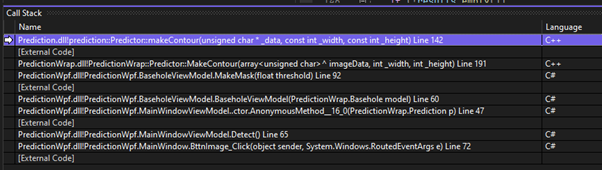
This is not just some theoretical issue, currently the generated code for interfaces does not have the null pointer checking which classes do, this means if you call a function on a null interface, it will not be caught by haxe-debugger and your program will just crash with a segmentation fault.
The other situation this occurs in a lot is native code and interop, most of the types in the “cpp” package are not safe. Types such as “cpp.RawPointer” and “cpp.Star” represent native pointers and do not have the checks generated, if you call an extern function which returns a null pointer and you forget to check it, then you’re going to get an un-debugable crash.
C++ debugging
Externs allow you to call native c++ code from your haxe program, but most of the time you will be wrapping those calls in glue code to transform it into haxe friendly data structures instead of just exposing raw pointers, c arrays, etc, to your haxe code. This glue code could either be in haxe by using the helper types and functions in the “cpp” package, or in C++ where you could write wrapper functions to generate haxe arrays, enums, anonymous objects, and whatever else you might want in C++. In both these cases hxcpp-debugger doesn’t give you the tools you want. Non haxe types aren’t inspectable and any C++ glue code also can’t be debugged. Pausing your program only pauses the haxe threads, native C++ threads are free to continue running which means they’re also not inspectable.
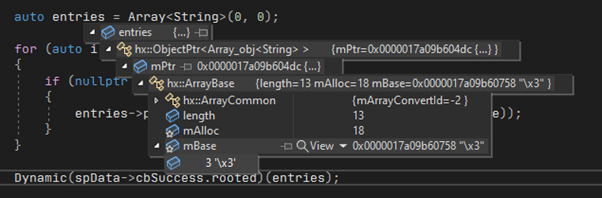
This means when it comes to debugging interop code a native C++ debugger like visual studio needs to be used. This does work well, but its not a great experience. The C++ generated by the haxe compiler isn’t the most human readable, eventually you get an understanding of why its generated the way it is, but it’s never the simplest to understand. Most of the hxcpp types and data structures aren’t natively understood by the debuggers so you get no visualisations. I.e hovering over a hxcpp array type in visual studio doesn’t give you a nice list of the contents. Instead, you get this.
You can write your own visualisations, but this isn’t easy as it requires in depth knowledge of hxcpp internals and each c++ debugger has its own method of writing visualisations.
Mixed mode debugging
The issue of having two languages and needing to switch between debuggers as and when isn’t a situation unique to haxe. Most languages have FFIs and usually you’d need to choose between debugging one language or the other, but some ecosystems have solved this issue.
Visual Studio has a featured called mixed mode debugging which allows you to debug C# and C++ in the same debug session, you can step into a C# function which calls C++ and then everything seamlessly switches over to C++ debugging. The call stack shows C# and C++ functions, you can inspect both C# and C++ types, etc, etc.
Not having to constantly switch between a C# and a C++ debugger massively speeds up development time and makes debugging interop between the two languages very easy.
Could we have something similar?
I realised that the javascript debugging approach could work in this situation. Haxe and many other languages can compile to javascript and will generate a sourcemap.json file which the javascript debugger reads and uses to map the compiler generated javascript back onto the source language. Could the haxe compilers C++ generator be updated to emit a similar sourcemap file and a debugger be created which uses a C++ debugger under the hood?
Hxcppdbg
Yes! This is what I’ve been working on, and while it’s still early on it shows that the idea is sound. Under the hood a C++ debugger is being used to debug the hxcpp program but by using a sourcemap generated by haxe c++ line numbers can be mapped back onto haxe lines, functions are un-mangled and mapped back to haxe functions, all haxe classes and hxcpp structures are visualised in ways which make sense and hides runtime implementation details, and I’ve started on some of the mixed mode functionality.
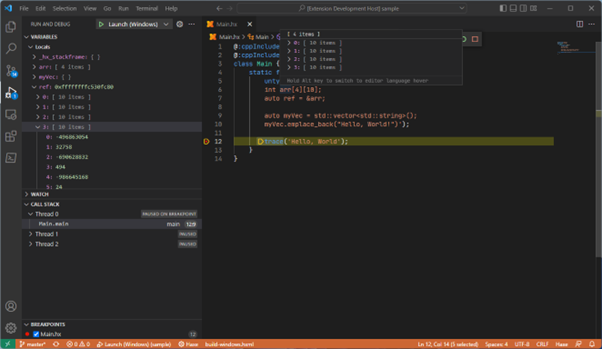
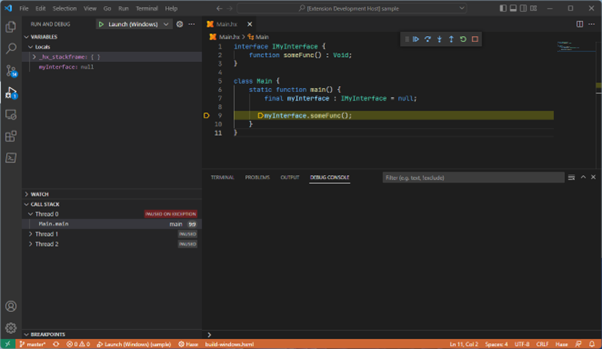
Untyped C++ can be debugged just fine, extern classes can also be inspected, and all C++ types and data can be inspected, even if you don’t fill out your extern class definition the fields will still appear.
Since a C++ debugger is being used, we get an inspectable program on native null pointer access. This means null interfaces can now be debugged and interop code is also inspectable when C++ errors occur!
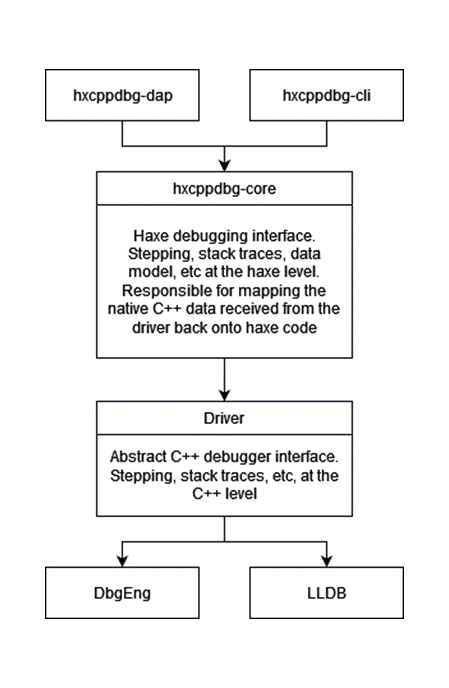
Internals
There are two main ways of interacting with hxcppdbg, the first is a basic command line interface which is mainly used for easier debugging, the second and main way is as a DAP (debug adapter protocol) server for IDE integrations. Both frontends use the hxcppdbg-core haxe library which provides an interface for debugging and inspecting a hxcpp program. Hxcppdbg-core contains a driver interface for the native debugger which allows multiple C++ debuggers to be used as a backend (DbgEng on Windows, LLDB elsewhere). When hxcppdbg-core is asked for the stack trace it will fetch the native stack trace from the driver and then map it back onto haxe code. When hxcppdbg-core is asked to step over a line it will potentially issue multiple native step overs to the driver based on information in the sourcemap.
File and line mapping
The sourcemap contains a record of every type and the haxe file its defined in, it also stores the location of generated .h and .cpp files for that type. A mapping between the line numbers in the generated c++ files and the line position of the corresponding haxe expression is also stored. This information allows us to place breakpoints in the native c++ code at a given haxe line. It also allows us to map c++ files and line numbers back to the original haxe files.
Name mapping and mangling
The c++ generator of the haxe compiler has a list of reserved names which variables are checked against and renamed if needed. The sourcemap keeps track of any renamed variables so they can be displayed as the user originally wrote them in the debugger.
Stepping
Stepping currently operates on a naïve algorithm, for a given step type continue performing native steps of that type until the c++ line maps onto a different haxe line than we started with. This works but, in many cases, can be slow. In the future I want to enhance the source map to contain an AST dump instead of a flat haxe to c++ line mapping so we can be smarter about this stepping algorithm.
Data Model
The targets memory is converted into the data model enum tree for easy traversal. This tree is lazy loaded, and the results cached, so target memory is only ever accessed once and is accessed on demand, so large arrays, maps, or other structures are not a problem.
enum ModelData
{
    MNull;
    MInt(i : Int);
    MFloat(f : Float);
    MBool(b : Bool);
    MString(s : String);
    MArray(model : Indexable<ModelData>);
    MMap(type : Keyable<ModelData, KeyValuePair>);
    MEnum(type : GeneratedType, constructor : String, arguments : Indexable<ModelData>);
    MAnon(model : Keyable<String, NamedModelData>);
    MClass(type : GeneratedType, model : Keyable<String, NamedModelData>);
    MNative(native : NativeData);
}

enum NativeData
{
    NPointer(address : Int64, dereferenced : ModelData);
    NType(type : String, model : Keyable<String, NamedModelData>);
    NArray(type : String, model : Indexable<ModelData>);
    NUnknown(type : String);
}
Non haxe types are placed into the native enum, this allows us to view native pointers, arrays, structs, classes, etc alongside the haxe types.
Running evaluations against this tree is then very simple, hscript is used to parse expressions and a custom interpreter used to run the hscript AST against the data model.
Planned
There is still much to do both big and small, below is a handful of the larger features I want to implement down the line.
- I want to work on further mixed mode debugging features. Ideally you should be able to step into an extern function from haxe and then start debugging c++.
- I want to make further improvements to the expression evaluator, allowing custom functions to be defined for later re-use.
- Other breakpoint types still need to be implemented (conditional, function, and log points).
- The LLDB driver needs some love. LLDB’s API is very lacking compared to the DbgEng and DbgModel libraries on Windows. This means that the entirety of the data model is un-implemented with LLDB. Adding support for this is proving to be a massive pain and as I don’t actively need non-windows support right now it’s been on the back burner for a while.
- The data model is currently read only, ideally you would be able to change values while the target it paused. This should be quite simple for ints, floats, and bools, but anything more becomes tricky as even strings use GC memory.
Hxcppdbg is not currently ready for use as it requires both a custom haxe fork and a custom hxcpp fork, the DAP server for IDE integration is also not packaged up in an easy to consume way. In time I hope to sort this out so its easier to try out, but in the mean time you can track progress on the github repo, or if you’re on the haxe discord channel in the hxcppdbg project post.
Uniform interface blocks (cbuffers in hlsl) have unintuitive alignment rules where block members can’t cross 16-byte boundaries and each array element must be aligned to 16 bytes.
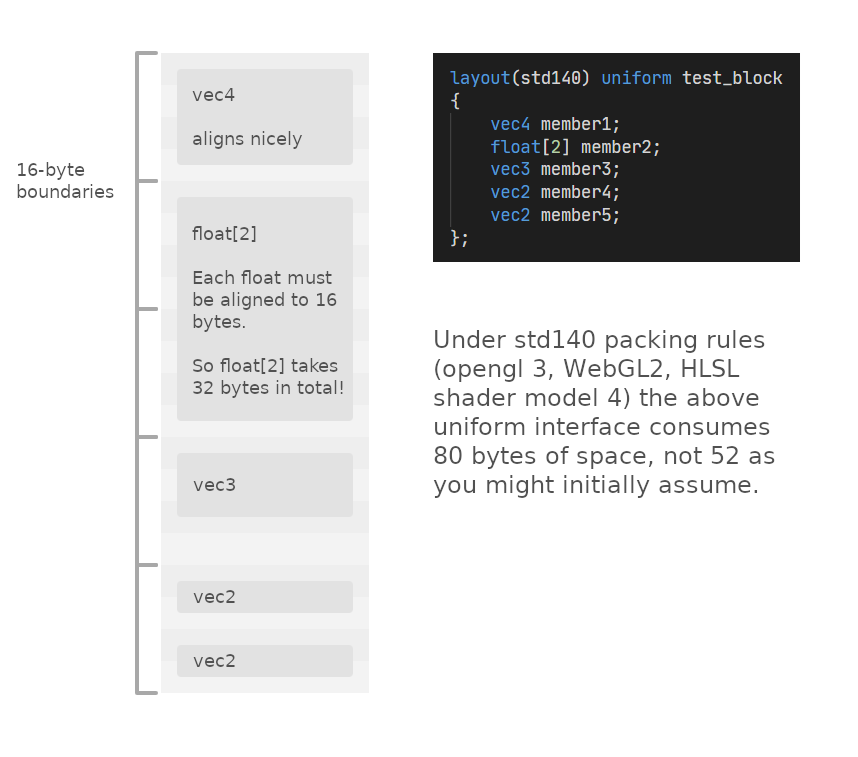
Manually packing data according to these rules is error prone as it’s easy to forget about some of the finer points of these rules (layout rules covers 2 pages in the OpenGL spec!) and adding, removing, or reorganising members can affect the alignment of following members.
I’m going to quickly cover how using spirv-cross, macros, and overloaded functions I generate abstracts at compile time from reflection data to handle all of this.
Spirv-Cross Reflection
At build time I compile my shaders to spirv bytecode using glslang, spirv-cross is then used to generate glsl code (for core 3.3 or ESSL) or shader model 5 HLSL. Spirv-cross also has facilities to output reflection data in a json format from the spirv file it reads in.
spirv-cross.exe input_vert.spv --stage --vert --extry main --reflect --output vert-reflection.json
spirv-cross.exe input_frag.spv --stage --frag --extry main --reflect --output frag-reflection.json
If we take the following fragment shader and look at the produced reflection data, we can see that spirv-cross has done most of the work for us!

The reflection data lists all the buffer objects and its members, it also lists the total size of the buffer, offset of all members, and in the case of array types, the stride of each element in the array. From this reflection data I pull out the relevant parts and save it so it can be read by an initialisation macro.
In my engine I have a UniformBlob class, it contains a few fields, but the main thing of interest is that it holds a haxe.io.ArrayBufferView which you can write data into before its uploaded to the GPU.
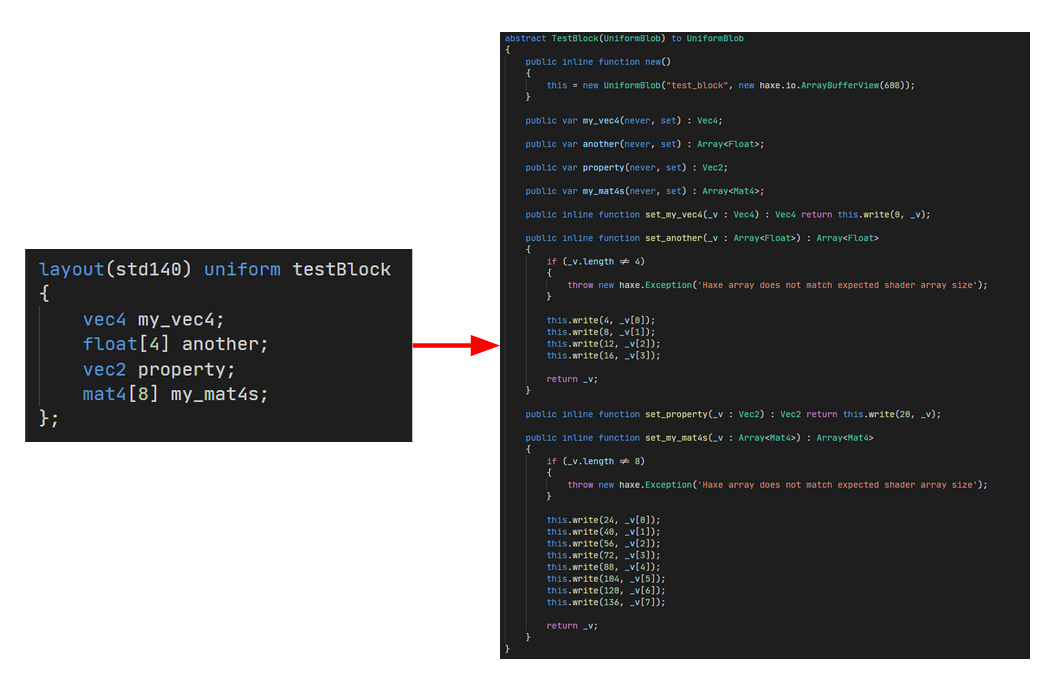
Using the reflection data from spirv-cross we can generate abstracts around this type for every uniform interface for all shaders. Properties with setters are generated for each member in the interface block which handles writing the data to the correct offset location in the buffer.
Haxe 4.2 introduced overloaded functions for non-extern types, using these we can greatly simplify the macro code which will generate these abstracts. The UniformBlob type contains an overloaded write function for all the basic glsl types supported (bool, int, float, double, vecs, and mats), this way we don’t have to have a writeInt, writeFloat, writeVec2, etc and instead of looking at the glsl type in the macro and calling the correct function based on the type we can always all write and the compilers overload resolution will handle it all for us.
// Small excerpt of the overloads from the `UniformBlob` class.
// `buffer` is the `haxe.io.ArrayBufferView` for the raw data.

public extern inline overload function write(_offset : Int, _v : Bool)
{
    final writer = Int32Array.fromData(buffer.getData());

    writer[_offset] = if (_v) 1 else 0;

    return _v;
}

public extern inline overload function write(_offset : Int, _v : Int)
{
    final writer = Int32Array.fromData(buffer.getData());

    writer[_offset] = _v;
}

public extern inline overload function write(_offset : Int, _v : Float)
{
    final writer = Float32Array.fromData(buffer.getData());

    writer[_offset] = _v;
}

public extern inline overload function write(_offset : Int, _v : Vec3)
{
    final writer = Float32Array.fromData(buffer.getData());
    final data   = (cast _v : Vec3.Vec3Data);

    writer[_offset + 0] = data.x;
    writer[_offset + 1] = data.y;
    writer[_offset + 2] = data.z;

    return _v;
}

public extern inline overload function write(_offset : Int, _v : Mat4)
{
    final data = (cast _v : Mat4.Mat4Data);

    write(_offset +  0, data.c0);
    write(_offset +  4, data.c1);
    write(_offset +  8, data.c2);
    write(_offset + 12, data.c3);

    return _v;
}
For these overloaded write functions, the offset is not in bytes but instead the size of the type, so all we need to do in the macro is divide the bytes offset from spirv-cross by the size of the type to get the correct offset.
Abstract Generation
The name of the interface block is used as the basis for the abstract name and using the reflected total size we can generate an haxe.io.ArrayBufferView to fit the size exactly.
final name = buffer.name.toUpperCaseFirstChar();
final type : TypeDefinition = {
    name   : name,
    pack   : [],
    kind   : TDAbstract(macro : uk.aidanlee.flurry.api.gpu.shaders.UniformBlob, null, [ macro : uk.aidanlee.flurry.api.gpu.shaders.UniformBlob ]),
    pos    : Context.currentPos(),
    fields : [
        {
            name   : 'new',
            pos    : Context.currentPos(),
            access : [ APublic, AInline ],
            kind   : FFun({
                args : [],
                expr : macro {
                    this = new uk.aidanlee.flurry.api.gpu.shaders.UniformBlob($v{ buffer.name }, new haxe.io.ArrayBufferView($v{ buffer.size }));
                }
            })
        }
    ]
}
For non-array types it’s very easy to add a new property to the abstract, again using the member’s name as the name for the property. AlignedOffset is the byte offset divided by the type size (8 bytes for double, everything else is 4 bytes). Here you can see the overloads coming into play, no need to look at the glsl type, just convert to a complex type and call write, the compiler will figure the rest out.
final complexType   = glslTypeToComplexType(member.type)
final alignedOffset = getAlignedOffset(member.type, member.offset);

type.fields.push({
    name   : member.name,
    pos    : Context.currentPos(),
    access : [ APublic ],
    kind   : FProp('never', 'set', ct)
});
type.fields.push({
    name   : 'set_${ member.name }',
    pos    : Context.currentPos(),
    access : [ APublic, AInline ],
    kind   : FFun({
        args : [ { name: '_v', type: ct } ],
        ret  : ct,
        expr : macro return this.write($v{ alignedOffset }, _v)
    })
});
For glsl array types we convert them to a haxe array type, we then chain together a series of write calls where we start at the base offset and step forward by the stride for each loop iteration. Since arrays must be constant sized in uniform interfaces, we can check to make sure the provided haxe array is the correct size and unroll the loop in the macro code.
final complexType = glslTypeToComplexType(member.type)
final arrayCt     = macro : Array<$ct>;
final chained     = [ for (i in 0...member.size) {
    final byteOffset    = member.offset + (i * member.stride);
    final alignedOffset = getAlignedOffset(member.type, byteOffset);

    macro this.write($v{ alignedOffset }, _v[$v{ i }]);
} ];

type.fields.push({
    name   : member.name,
    pos    : Context.currentPos(),
    access : [ APublic ],
    kind   : FProp('never', 'set', arrayCt)
});
type.fields.push({
    name   : 'set_${ member.name }',
    pos    : Context.currentPos(),
    access : [ APublic, AInline ],
    kind   : FFun({
        args : [ { name : '_v', type : arrayCt } ],
        ret  : arrayCt,
        expr : macro {
            if (_v.length != $v{ size })
            {
                throw new haxe.Exception('Haxe array does not match expected shader array size');
            }

            $b{ chained }

            return _v;
        }
    })
});
I’m using the vector-math library for my maths types and those map onto glsl vector and matrix types, all the generated functions are inlined so they play nicely with vector-maths operations being inlined to avoid allocations.
Conclusion
All the above stages (shader compilation, reflection, initialisation macro calls, caching) are handled automatically by my build tool so any changes made to shaders are automatically reflected in code. Its been really nice not having to deal with the hassle of uniform alignment and being able to get abstracts with properties which mirror the actual shader interface.
In the future I might add more abstract types for array types so you can partially update a uniform blob array type without having to re-assign the entire array.
Hopefully this gives some people ideas on how to improve working with shaders in code.
For the last few weeks, I’ve been rebuilding my game engine’s build tool after becoming increasingly frustrated at how inflexible the asset pipeline was as some of my projects started to grow or had unusual asset processing requirements. The build tool in its entirety (named Igloo) could be split into two main parts. The asset pipeline, where assets are serialised into files called “parcels” which are loaded by the engine. And the code generator, which is responsible for creating haxe hxml files, invoking the haxe compiler, and auto running the game if everything was successful. This article focuses on the overhaul to the asset pipeline stage of this tool.
My engine was initially heavily inspired by the old luxe alpha and the general structure of the asset pipeline was taken from there. In the existing solution assets are defined in json files which are read by the build tool. The json files use the format below.
{
    "assets" : {
        "bytes"  : [],
        "texts"  : [],
        "fonts"  : [
            { "id" : "roboto", "path" : "fonts/Roboto-Regular.ttf" }
        ],
        "sheets" : [],
        "sprites" : [],
        "images" : [
            { "id" : "tank1", "path" : "images/tank1.png" },
            { "id" : "tank2", "path" : "images/tank2.png" },
            { "id" : "tank3", "path" : "images/tank3.png" },
        ],
        "shaders" : [
            {
                "id" : "textured",
                "vertex" : "shaders/textured.vert.glsl",
                "fragment" : "shaders/textured.frag.glsl"
            }
        ]
    },
    "parcels" : [
        {
            "name"    : "preload",
            "images"  : [ "tank1", "tank2", "tank3"  ],
            "fonts"   : [ "roboto" ],
            "shaders" : [ "textured" ]
        }
    ]
}
As you can see there are a finite number of hard coded asset types. If the asset you want to include doesn’t fit into one of those six types, then you must bodge it to make it fit.
This usually means putting the asset in the “bytes” category and parsing it at game runtime. This isn’t great as often the assets are editor formats (e.g., tiled xml files, aseprite files, etc) which are large and slow to parse. Adding more types to the pipeline also isn’t ideal, especially in the case of more open ended editor formats such as tiled maps. The expected tile layers, object layers, masks, etc in a map for one project might differ substantially from another, so even with generic tiled support we’re still doing a lot of the work at game runtime.
The solution envisioned of was to have the pipeline be extendable by user written scripts. These “asset processors” would register themselves as wanting to operate on specific file types, read those editor formats at compile time, and write only the data we’re interested in into the parcel. This would allow projects to serialise assets to fit their exact needs instead of trying to make one size fits all solutions.
Libgdx has support for user user resource loaders but they exist at runtime instead of compile time. XNA and Monogame have a similar system to the one I wanted to make, their content pipeline tool can be extended with C# dlls allowing users to write compile time processors for any assets they require.
Potential Haxe Solutions
The existing build tool was compiled as a Neko “run.n” file which was invoked through haxelib to build assets and code for a given project. Initially I investigated a plugin system where extra Neko module would be dynamically loaded, this seemed like it could work as Neko appears to support loading extra modules at runtime.
Ultimately, I decided against Neko as performance was also another area I wanted to improve. In the existing tool the more intensive parts of parcel generation (such as building texture atlases) was being passed off to pre-compiled HXCPP programs to get a good speed and to use existing native libraries. Even with some work being passed off to native executables the whole parcel generation process was slower than I’d like.
Hashlink was another avenue I briefly explored before moving on, at the time of writing hashlink doesn’t appear to have any way to load extra code at runtime.
What I decided to go with was HXCPP with cppia scripting. Cppia is probably the least used haxe target and has little documentation (even by haxe standards!) but seemed ideal for my needs. When you compile a haxe program with the cppia target you get a file with bytecode like content, HXCPP programs can load these cppia scripts and execute their main function, or if they’re compiled as a library (without a main) it can instantiate classes compiled within the script.
One of the interesting things about cppia scripts is when compiling them you can link them against an existing HXCPP program (assuming it was compiled with –D scriptable), this means if you reference classes which are compiled into the HXCPP host it won’t include them in the script. This allows you to put the performance sensitive parts of the program into the HXCPP host and the compiled cppia scripts can call that code without knowing or caring if its stored in the script or host executable.
Overview of the New System
The parcels and the assets are still defined in json files, but the specific types have been entirely removed. All source assets are defined in a json array.
{
    "assets" : [
        { "id" : "tank1", "path" : "images/tank1.png" },
        { "id" : "tank2", "path" : "images/tank2.png" },
        { "id" : "tank3", "path" : "images/tank3.png" },
        { "id" : "textured", "path" : "shaders/textured.glsl" },
        { "id" : "roboto", "path" : "fonts/Roboto-Regular.ttf" },
    ],
    "parcels" : [
        { "name" : "preload", "assets" : [ "tank1", "tank2", "tank3", "roboto", "textured" ] }
    ]
}
A projects build file now allows you to specify haxe files which will be compiled into cppia scripts. The script must define a class which extends igloo.processors.AssetProcessor<T> which has the same name as the script file. The optional flags field in the json allows you to add extra haxe arguments when compiling the processor.
{
    "app" : {
        "name"      : "Project",
        "main"      : "Main",
        "output"    : "bin",
        "codepaths" : [ "src" ],
        "author"    : "Aidan Lee",
        "backend"   : "Sdl"
    },
    "build" : {
        "processors" : [
            { "script" : "scripts/MyCustomProcessor.hx", "flags" : "-D extra-haxe-args" }
        ]
    },
    "parcels" : [ "assets/assets.json" ]
}
That igloo.processors.AssetProcessor<T> type has the following signature.
class AssetProcessor<T>
{
    public function ids() : Array<String>;

    public function pack(_ctx : ParcelContext, _asset : Asset) : ResourceRequest<T>;

    public function write(_ctx : ParcelContext, _writer : Output, _data : T, _response : ResourceResponse) : Void;
}
Eventually this will be one of the new haxe 4.2 abstract classes to ensure these functions are implemented. Currently abstract classes are not supported on cppia so for now its a bog standard class.
The ids function returns an array of strings for file extensions which the processor will operate on.
The pack function takes in those source assets defined in the json files and returns 1…N resource requests. This allows each source asset to produce multiple output resources for the parcel, each request can also specify if it wants to be packed into a texture atlas. This means any processor can gain all the benefit of build time texture packing instead of it being reserved for special built-in types or being done at game runtime.
Each of these generated resource requests are resolved by the build tool (i.e., packing them in an atlas if they requested in) and then the passed into the write function of the same processor. The output object of the write function is where you send your custom data into the parcel stream.
The AssetProcessor type is generic, the purpose of this is to allow data to be passed between the pack and write functions for a particular source asset and its generated resource requests. Each AssetProcessor is only created once and is used for multiple source assets and resource responses, so it would be difficult to add fields to the processor class to hold data for a specific source asset.
import haxe.Exception;
import haxe.io.Output;
import igloo.utils.Unit;
import igloo.parcels.Asset;
import igloo.parcels.ParcelContext;
import igloo.processors.RequestType;
import igloo.processors.AssetProcessor;
import igloo.processors.ResourceRequest;
import igloo.processors.ResourceResponse;

class ImageResourceProcessor extends AssetProcessor<Unit>
{
    override public function ids()
    {
        return [ 'png', 'jpg', 'jpeg', 'tga', 'bmp' ];
    }

    override public function pack(_ctx : ParcelContext, _asset : Asset)
    {
        final absPath = _ctx.assetDirectory.join(_asset.path);

        return new ResourceRequest(Unit.value, PackImage(_asset.id, absPath));
    }

    override public function write(_ctx : ParcelContext, _writer : Output, _data : Unit, _response : ResourceResponse)
    {
        switch _response
        {
            case Packed(frame):
                // `id` and `pageID` are project unique integers given to each resource and page.
                _writer.writeInt32(frame.id);
                _writer.writeInt32(frame.pageID);

                // Write pixel location of the frame in the page.
                _writer.writeInt32(frame.x);
                _writer.writeInt32(frame.y);
                _writer.writeInt32(frame.w);
                _writer.writeInt32(frame.h);

                // Write UV information for the packed frame.
                _writer.writeFloat(frame.u1);
                _writer.writeFloat(frame.v1);
                _writer.writeFloat(frame.u2);
                _writer.writeFloat(frame.v2);
            case NotPacked(_, _):
                throw new Exception('ImageResourceProcessor can only operate on packed responses');
        }
    }
}
A complete processor is shown above. This processor operates on image files, for each source asset it produces one resource request to pack the image into the texture atlas. The pixel coordinates, uv coordinates, unique ID, and page ID for the image is written into the parcel stream in the write function.
Bootstrapping
With the build tool being a native program the Neko program invoked through haxelib is now responsible for bootstrapping that program for projects. Calling “haxelib run flurry install” will compile the build tool into a “.flurry” folder in the calling directory and create a PowerShell or bash script for easily invoking it.

By using the dll_export path you can control the location of the metadata file the compiler will produce which contains information on all classes compiled into the cppia host. The path of this file along with the source code path of the build tool is baked into the executable as it is read back at runtime and passed to the haxe compiler when compiling asset processor scripts. When compiling cppia scripts the dll_import define can be used to point to a host metadata file to avoid including classes which already exist in the host.
DCE should be disabled when compiling a cppia host, if you don’t do this then the metadata file produced could contain classes which were eliminated by the DCE (especially true with the std library), forgetting to do this can lead to linking errors when trying to run your cppia scripts.
Compiling Scripts
The first stage of the asset pipeline is to load all scripts and create an instance of each asset processor. Apart from the scripts specified in the project build file, there are a handful of built-in processor scripts which handle basic assets like images and shaders out the box.
The scripts are compiled by invoking haxe and setting a handful of code paths (the directory the script is in and the path to the source code path the tool was bootstrapped from) and passing any requested flags.
Each compiled cppia script is cached and a metadata file is generated containing the timestamp when it was built along with all the command line flags used to compiled said script. This is used on subsequent runs to potentially skip this compilation stage. If a scripts modification date is less than the timestamp in the metadata file and the command line arguments match, then the script has not been modified since it was compiled so does not need compiling again.
Using cpp.cppia.Module.fromData these compiled cppia scripts are then loaded into individual modules, using the resolveClass function we can get a Class<T> for each processor class and construct an instance of it using Type.createInstance. This step is why the class which extends igloo.processor.AssetProcessor must have the same name as the script and not be in any package, the file name is used for the resolveClass call.
For anyone using cppia modules make sure you call the “boot” function on them! I spent an entire afternoon trying to figure out why all statics in my cppia scripts were null, turns out the boot function is responsible for setting their initial values.
All these created AssetProcessor instances are added into a map where they keys are the strings returned by each processor’s ids function. If multiple processors both want to load assets with the same extension this is logged and the latest one replaces the existing.
Since the haxe compiler is only single threaded and each script is independent of each other, this compiling, loading, and instantiation processor for each script is a prime target for multithreading. The haxe-concurrent library is used to provide a task pool for concurrent processor loading which gives a significant speed up on fresh project builds or builds where lots of cached scripts were invalidated.
Packaging Parcels
Resource Requests
Once all the resource requests have been generated by the pack calls to processors these requests are then transformed into resource responses. Each response is given a project unique integer ID (increments from 0), the ID of the asset processor used generate that request is stored as well.
If the request stated that it contains data which wants to be placed into the texture atlas, then a rectangle large enough to fit the data is packed into the atlas using the bin-packing haxelib library. The position of the rectangle within the atlas is also stored in the response.
Atlas Page Generation
The atlas may have multiple “pages” to it, each page will be generated as a separate texture. When the bin-packing library fails to insert a rectangle into the current page a new page is created to fit that rectangle. Once all requests have been resolved no more rectangles will be inserted into the atlas so the textures can be generated. For each page a haxe.io.Bytes object is allocated and all data which was packed within is copied into its appropriate position by checking against the requests packed rectangle.
This is another area which benifits from concurrency. Each page is unique and by throwing the page generation functions onto a threadpool we get a nice speedup for atlases which have many pages (we could go one step further and throw all individual packed rectangles onto a threadpool, but I haven’t profiled that yet to see if its worth it).

The above is a very basic WPF program to display all pages contained within a parcel. The screenshot shows the result of loose images, pre packed texture atlases, and a dynamically generated atlas all packed into a single page.
Writing Responses
With all pages output into the parcel stream, all the resource responses are passed into the write function of the processor which originally generated them. The generic data T from the pack function and the location of the packed rectangle (if originally requested) are also passed into this function.
In the parcel stream the RESR magic bytes are written along with the string id of the processor used just before calling the write function. This allows the engines parcel reader to pass off reading to the appropriate loader when coming across a resource in the stream.
Caching
Invalidation
Once all data has been written to the parcel stream the produced parcel is cached and a json metadata file is stored alongside it. This metadata file is used to check if the parcel is still valid on subsequent builds, if the parcel is not invalidated then the entire packaging stage previously described can be skipped, and the cached parcel reused.
{
    "timeGenerated": 1626805396370,
    "gpuApi": "d3d11",
    "processorsInvolved": [
        "ImageResourceProcessor",
        "GdxSpriteSheetProcessor"
    ],
    "pages": [
        {
            "id": 0,
            "pos": 5,
            "length": 840581,
            "width": 4096,
            "height": 4096
        }
    ],
    "assets": [
        {
            "name": "tank1",
            "produced": [
                {
                    "name": "tank1",
                    "id": 1,
                    "pos": 846553,
                    "length": 44
                }
            ]
        },
        {
            "name": "rts_unit_atlas",
            "produced": [
                {
                    "name": "scifiUnit_1",
                    "id": 2,
                    "pos": 844430,
                    "length": 44
                },
                {
                    "name": "scifiUnit_2",
                    "id": 3,
                    "pos": 844474,
                    "length": 44
                }
            ]
        }
    ]
}
Above is a sample metadata file. The processorsInvolved array is a string of all processor names used to produce the resources within. When processors are initially loaded, we track if any of them were recompiled. If any of the processors in this array were re-compiled for the current build, then the parcel is invalid and needs to be re-packaged.
The gpuApi field holds the graphics API used by the cached parcel. If it does not match the current builds selected API then the parcel is invalid. Processor pack and write functions can query this value and could potentially output different resources and write different data depending on the API used (The built in shader processor will either write dxbc bytecode or glsl source code depending on the api, for example).
Each asset which will be packed into a parcel based on the projects asset bundles then has two checks performed on it. The first is checking if the modification date of the asset is greater than the metadata’s timeGenerated value. If so, the parcel is invalidated. Processors can optionally override a function called isInvalid to modify this behaviour. Some assets may have one key file and multiple sub files which are loaded in the pack function. Using this function, you can add custom invalidation checks for the assets a processor will handle.
The second check is that the asset is packed in the cached parcel. If no matching name is found from the “assets” array, then the asset was not used when the cached parcel was created so it is invalidated.
Reclaiming IDs
The metadata file contains data on all pages and resources (along with the asset which produced them) contained in the cached parcel, the id field is the project unique ID given to each page and resource. In the event that the parcel is invalidated, all these IDs are reclaimed by the asset pipeline. This allows those IDs to be reused instead of finding the largest ID from all parcels and starting there for any new assets, this keeps our incrementing unique IDs tightly packed.
Engine Integration
Resource Readers
In my engine resource readers are responsible for loading the resources contained within the parcel stream. The base reader class is very simple and shares a fair bit in common with the processor classes.
class ResourceReader
{
    public function ids() : Array<String>;

    public function read(_input : Input) : Resource;
}
The ids function allows the loader to indicate what sort of resources it wants to load. These should match against the ids returned by the processors ids function. The read function should then read back the data output in the processors write function. For my engine I require all resources to extends the Resource type so that’s what this function returns for my loading system.
package uk.aidanlee.flurry.api.resources.loaders;

import haxe.io.Input;
import uk.aidanlee.flurry.api.resources.builtin.PageFrameResource;

class PageFrameLoader extends ResourceReader
{
    override function ids()
    {
        return [ 'png', 'jpg', 'jpeg', 'tga', 'bmp', 'atlas' ];
    }

    override function read(_input : Input)
    {
        final id   = _input.readInt32();
        final page = _input.readInt32();

        final x = _input.readInt32();
        final y = _input.readInt32();
        final w = _input.readInt32();
        final h = _input.readInt32();

        final u1 = _input.readFloat();
        final v1 = _input.readFloat();
        final u2 = _input.readFloat();
        final v2 = _input.readFloat();

        return new PageFrameResource(id, page, x, y, w, h, u1, v1, u2, v2);
    }
}
This is the corresponding resource reader to the ImageResourceProcessor processor shown towards the beginning of this post. The array returned ids also has a “atlas” string as this reader is also used to read the resources output by a libgdx atlas processor.
import uk.aidanlee.flurry.Flurry;
import uk.aidanlee.flurry.FlurryConfig;

class Project extends Flurry
{
    override function onConfig(_config : FlurryConfig) : FlurryConfig
    {
        _config.window.title  = 'Project';
        _config.window.width  = 768;
        _config.window.height = 512;

        _config.resources.loaders = [ new CustomResourceLoader() ];
        _config.resources.preload = [ 'preload' ];

        return _config;
    }
}
You can create and register custom loaders through the _config.resources.loaders array in the onConfig function of a project.
Parcel Auto Completion
The advantage of a project wide unique ID which increments from zero and attempting to keep it tightly packed is that the resources can then be stored in a flat array with minimal memory waste. The metadata files described above are also re-used for this purpose. At build time all metadata files are read, and the largest ID is found and used to allocate a vector of that size.
Each parcel in the project also has a class generated with the parcel name as the class name and static inline variables for all the resources in that parcel with the unique ID as the value.
{
    "assets" : [
        { "id" : "tank1", "path" : "images/tank1.png" },
        { "id" : "tank2", "path" : "images/tank2.png" },
        { "id" : "tank3", "path" : "images/tank3.png" },
        { "id" : "textured", "path" : "shaders/textured.glsl" }
    ],
    "parcels" : [
        { "name" : "preload", "assets" : [ "tank1", "tank2", "tank3", "textured" ] }
    ]
}
The above json parcel bundle will produce the following class in the uk.aidanlee.flurry.api.resources.Parcels module for use in engine.
class Preload
{
    public static inline var tank1 = 0;

    public static inline var tank2 = 1;

    public static inline var tank3 = 2;

    public static inline var textured = 3;
}
These parcel classes can then be used for access resources in the game engine. Below is a minimal project for displaying three images on the screen.
import uk.aidanlee.flurry.Flurry;
import uk.aidanlee.flurry.FlurryConfig;
import uk.aidanlee.flurry.api.gpu.geometry.shapes.QuadGeometry;
import uk.aidanlee.flurry.api.resources.builtin.PageFrameResource;
import uk.aidanlee.flurry.api.resources.Parcels.Preload;

class Project extends Flurry
{
    override function onConfig(_config : FlurryConfig) : FlurryConfig
    {
        _config.window.title  = 'Project';
        _config.window.width  = 768;
        _config.window.height = 512;

        _config.resources.preload = [ 'preload' ];

        return _config;
    }

    override function onReady()
    {
        final camera  = renderer.createCamera2D(display.width, display.height);
        final batcher = renderer.createBatcher({ shader : Preload.textured, camera : camera });

        new QuadGeometry({
            texture  : resources.getAs(Preload.tank1, PageFrameResource),
            batchers : [ batcher ],
            x : 192, y : 64, width : 256, height : 256
        });
        new QuadGeometry({
            texture  : resources.getAs(Preload.tank2, PageFrameResource),
            batchers : [ batcher ],
            x : 256, y : 128, width : 256, height : 256
        });
        new QuadGeometry({
            texture  : resources.getAs(Preload.tank3, PageFrameResource),
            batchers : [ batcher ],
            x : 320, y : 192, width : 256, height : 256
        });
    }
}
Future Additions
Wildcard Matching
Currently each individual asset much be manually specified in the json file. It would be nice to be able to specify wildcard / file glob matching.
Specific Processor
While file extension works for most cases it would be nice to be able to specify an exact processor an asset should be used. If set this would take precedence over the file extension.
Partial Packaging
The metadata file contains info on the position and length of each page and resource in the parcel. This is currently unused but is setting the groundwork for partial packing. Instead of invalidating an entire parcel only the resources which need to be re-packaged will be.
Hot Reloading
Following partial packing it should be possible to implement hot re-loading for some resource types under certain conditions.
Conclusion
Hopefully this article was interesting to some people and offers some ideas on cppia usage for others projects.
If you want to see the code in full it currently lives in the following branch https://github.com/flurry-engine/flurry/tree/features/igloo and can be found under src/igloo. Note that this is my own engine created mainly for my own use / experimentation, so don’t expect any sort of documentation, getting started guide, or really anything other than code comments.